| I. Building a standalone NetBeans editor | ||
|---|---|---|
 |  | |
As I said previously, the NetBeans Platform contains a library called "The NetBeans Editor Library". This is, as far as I know, one of the most powerful open-sourced Swing text libraries out there, fully compliant with the Swing Text API.
Once upon a time, the NetBeans Team did an effort to make this excellent piece of code available as a standalone library. And, as of today, the library can still be used in standalone Swing applications.
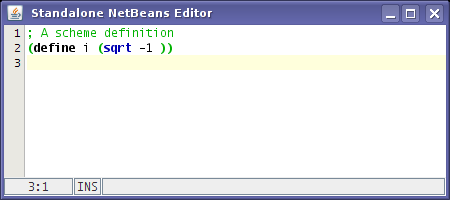
In this appendix I present a tiny library that I've cooked that allows me to add a text editor based on the NetBeans Editor Library (this is, a text editor with syntax highlighting, line numbers and lots of cool features) in any Swing application.
Using the NetBeans editor in standalone applications, without the benefits of the whole NetBeans Platform, is somewhat weird. It's like having eggs without bacon (or, as we say here in Spain, "a day without bread"). Since we're going to use just a small set of NetBeans libraries, we'll miss lots of good features from the NetBeans Platform, such as code completion, for instance.
So, before going any further, let me give you a piece of advice: use the standalone NetBeans editor only if you have to (because you have a legacy Swing application, for instance) or as a way to learn about the NetBeans editor internals, or to have a quick and dirty way to test your syntax objects. But I wouldn't recommend you building a Swing application from scratch without using the whole NetBeans Platform. You'll definitely miss it!
The good news is that all the code described in this appendix is highly reusable in your NetBeans Platform based applications!
So let's get our feet wet with the standalone NetBeans editor.
This is what we need to build a standalone NetBeans editor.
- Some NetBeans jar files
First of all we'll need four NetBeans 5.5 jar files (NetBeans 5.0 jar files will do too): org-openide-util.jar, org-netbeans-modules-editor-lib.jar, org-netbeans-modules-editor-util.jar and org-netbeans-modules-editor-fold.jar.
NetBeans 5.5 is released under the CDDL, so I think you can use those files without any legal problems. NetBeans 5.0 is released under the SPL, so there may be some legal concerns if you release those files alone (but I'm not sure: I'm glad I'm not a lawyer ;-)).
Note that those files don't contain all features of the editor. You don't have code completion (org-netbeans-modules-editor-completion.jar) nor bookmarks (org-netbeans-modules-editor-bookmarks.jar), for instance. I've decided to add just as little jars as possible to make the standalone editor runnable, but you're welcome to experiment adding some more jars if you want some extra functionality. You'll end up seeing that the NetBeans Platform is a much better choice, then! ;-)
- Some specific classes for your editor
Of course we'll need specific classes for the language we'll be editing: a custom Syntax object (that parses our text), a custom TokenContext object (that specifies the tokens in our language), a custom TokenColoringInitializer (that specifies the colors of our tokens) and a SettingsInitializer (that specifies different editor settings, such as visibility of line numbers, text anti-aliasing, the height of line-separation, and more).
These classes are described somewhere else (Section 8, “Colorful editors: The Old, The Good and The Young”) in this document.
Note that you can reuse all these classes in your applications based on the NetBeans Platform. In fact using this standalone editor is a good way to test your syntax objects!
I have built a small project that contains source code for a Scheme language Syntax object, as well as a SettingsInitializer for Scheme and all those files you need. You may want to use those as a basis to build your custom syntax objects, or reuse some of the excellent NetBeans Syntax objects out there (such as the SQL Syntax).
- A tiny library
In order to hide all editor internals I've built a tiny library (CDDL) that eases things. This tiny library is optional: you can either use it or do those internal calls yourself, by hand.
So let's see what has to be done. Let's start doing things by hand.
The very first thing we need to do is to initialize the NetBeans Editor Library settings stuff. You can do it yourself, like this:
import org.netbeans.editor.*;
...
Settings.addInitializer( new BaseSettingsInitializer(), Settings.CORE_LEVEL );
Settings.addInitializer( new ExtSettingsInitializer(), Settings.CORE_LEVEL );
Settings.reset();
Or, as we'll see in a minute, you can let the tiny library to do it for you.
After initializing the NetBeans Editor Library settings mechanism, you can add your own settings, using a similar code:
import org.netbeans.editor.*;
...
Settings.addInitializer( new MyCustomSettingsInitializer() );
Settings.reset();
Or, if you wish, you can let the tiny library do it for you too.
Note that the "MyCustomSettingsInitializer" is a class you have to build. This "SettingsInitializer" is valid for a given mime type, so all those settings will be used for all editors of that type.
The "SettingsInitializer" is the place where you specify the settings for your editor, such as if line numbers are to be visible, or if you want antialiased text, or if you want to make the status bar visible, the height between lines in the editor and tons of many other options.
For more information on the set of settings available please see the SettingsNames class.
After adding your settings to the hierarchy of settings, you need to register your editor kit using Swing's registration mechanism (JEditorPane.registerEditorKitForContentType). Again you can do it yourself, like this:
import javax.swing.JEditorPane;
...
MyCustomEditorKit kit = new MyCustomEditorKit();
JEditorPane.registerEditorKitForContentType(
  kit.getContentType(),
  kit.getClass().getName() );
Or, of course, you can let the tiny library do this for you, as we'll see in a minute.
Finally you may want to add your preferred key bindings to a huge variety of actions. You can do it yourself, like this:
JEditorPane pane = new JEditorPane();
pane.setContentType( kit.getContentType() );
pane.getInputMap().put(
  KeyStroke.getKeyStroke("DELETE"),
  ExtKit.deleteNextCharAction );
Or, again, you can let the tiny library add lots of key bindings for you. Note that the "ExtKit" class has tons of interesting actions that you can reuse in JMenus and JButtons or wherever. This set of actions is the most powerful I've seen so far out there.
If you have followed all the steps above then you should be able to edit text in your JEditorPane without problems. In fact the JEditorPane will render the different tokens with the colors that you have specified in the TokenColorizer.
So far so good. But, where's the NetBeans editor status bar? Why can't we see a bar with line numbers?
The fact is that those little features are only available if you use a custom JComponent responsible for rendering text. Well, of course! JEditorPanes don't have line numbers after all!
So we need a custom JComponent responsible for rendering the status bar and the line number bar. And such a JComponent is created like this:
JEditorPane myEditorPane = ...
JComponent myEditorComponent =
  ExtUtilities.getExtEditorUI( myEditorPane ).getExtComponent();
Or, again, you can use the tiny library as we'll see in a minute.
The created JComponent has some interesting properties. Apart of presenting the line number bar and status bar (if you have made them visible in your custom EditorSettings object), there're some other important things to note:
- No JScrollPane needed
The created JComponent already incorporates its own (fast?) scrolling mechanisms, so you don't need to wrap it around a JScrollPane.
The JEditorPane and the specific JComponent have a funny behaviour: if you make the JEditorPane visible then the JComponent does not work anymore, and if you make the JComponent visible then the JEditorPane stops working!
I think this is so because the JComponent replaces the JEditorPane UI, and that's why you can either use one or the other.
The important thing to remember is that you want to use a JEditorPane to set text into the editor, but you want to use the JComponent to visualize the JEditorPane content. So remember to make just the JComponent visible (by adding it to a JFrame, for instance) and remember to keep a reference to the JEditorPane to be able to set text into the editor.
So having seen the internals of this standalone editor let's see how we can do things easier. The tiny library contains a single class called "NBEditorFactory". Let's see how to use it by using the following example:
/** Creates new form NBEditorLibDemoFrame */
public NBEditorLibDemoFrame()
{
initComponents();
// Create an editor kit for Scheme
SchemeEditorKit editorKit = new SchemeEditorKit();  // Initialize Scheme language support
NBEditorFactory.addSyntax( editorKit, new SchemeSettingsInitializer() );
// Initialize Scheme language support
NBEditorFactory.addSyntax( editorKit, new SchemeSettingsInitializer() );  // Create a plain editor pane
JEditorPane editorPane = new JEditorPane();
// Create a renderer to replace the editor pane *visually*
JComponent renderer =
NBEditorFactory.newTextRenderer( editorKit, editorPane );
// Create a plain editor pane
JEditorPane editorPane = new JEditorPane();
// Create a renderer to replace the editor pane *visually*
JComponent renderer =
NBEditorFactory.newTextRenderer( editorKit, editorPane );  // Set the text *in the editor pane*
editorPane.setText("; A scheme definition\n(define i (sqrt -1 ))\n");
// Set the text *in the editor pane*
editorPane.setText("; A scheme definition\n(define i (sqrt -1 ))\n");  // Visualize the *renderer*
getContentPane().add( renderer, BorderLayout.CENTER );
// Visualize the *renderer*
getContentPane().add( renderer, BorderLayout.CENTER ); 
Let's see what the code above does:
Creates a new ExtEditorKit for the Scheme language (the source code for SchemeEditorKit is available in the example). | |
Initializes the editor settings (if needed), and then registers the SchemeSyntax object and the Scheme editor settings. (Source code for SchemeSyntax and SchemeSettingsInitializer available in the example). | |
Creates the custom JComponent to be used instead of the JEditorPane for visualization purposes. | |
Adds some text into the JEditorPane. Note that we keep on using the JEditorPane to add text to the editor, but we will use the JComponent for visualization purposes... | |
Adds the JComponent to the frame, to visualize text. Note that we don't add the JEditorPane, but the JComponent instead. |
So what are you waiting for? Do it yourself! Now you know how to do it! Don't you? Let me review the basics again for you, just in case:
- Build the syntax, settings and other files for your language
Start by taking a look at the the NetBeans Syntax Highlighting Tutorial (hurry up, this is going to change with the new syntax support!). You may also go take a look at the Section 8, “Colorful editors: The Old, The Good and The Young” and to the Section 9, “Adding Syntax Support” sections.
- Get the tiny library
Or build your own. You can download it from my attic. Don't forget to get the jar files from a working NetBeans 5.5 IDE.
- And don't forget...
- ... that using the NetBeans Editor Library as a standalone editor is probably a bad idea. The NetBeans Platform has lots of good stuff in there you can't miss! Keep tuned for more news, and have fun editing!
| | | |
| 13. Invoking Scheme II (Lookup) |  | 14. Alphabetical Index |
blog comments powered by Disqus
